

Table of Contents
- Why Press On Nail Sizes Decide How Long Your Set Lasts
- How to Measure Nail Width With Flexible Tape
- Reading a Press On Nail Sizing Kit and Size Chart
- How to File Press On Nails for Better Fit
- Sizing for Curves, Shapes, and Flat vs. Convex Nail Beds
- How to Make Press On Nails Stay On Longer
- Common Sizing Mistakes to Avoid
- Conclusion
- Frequently Asked Questions
Last Updated: October 2, 2026
Why Press On Nail Sizes Decide How Long Your Set Lasts
The wrong size is the number one reason press-ons pop off early. According to the American Academy of Dermatology's nail care guidance, the average fingernail grows about 3.5 millimeters per month, which means a loose press-on catches on everything within days. This guide from Liquid Glamour Nails shows you how to choose press on nail sizes that stay put.
What Happens When a Press-On Is Too Big or Too Small
An oversized press-on presses against your sidewalls, causing pain and early lifting. An undersized one leaves gaps where water and air sneak in, breaking down the adhesive until the nail pops off. Both are fixable with accurate millimeter measurements before you press anything down.
How to Measure Nail Width With Flexible Tape
Measuring takes about two minutes per hand with a flexible tape, a pen, and good lighting.
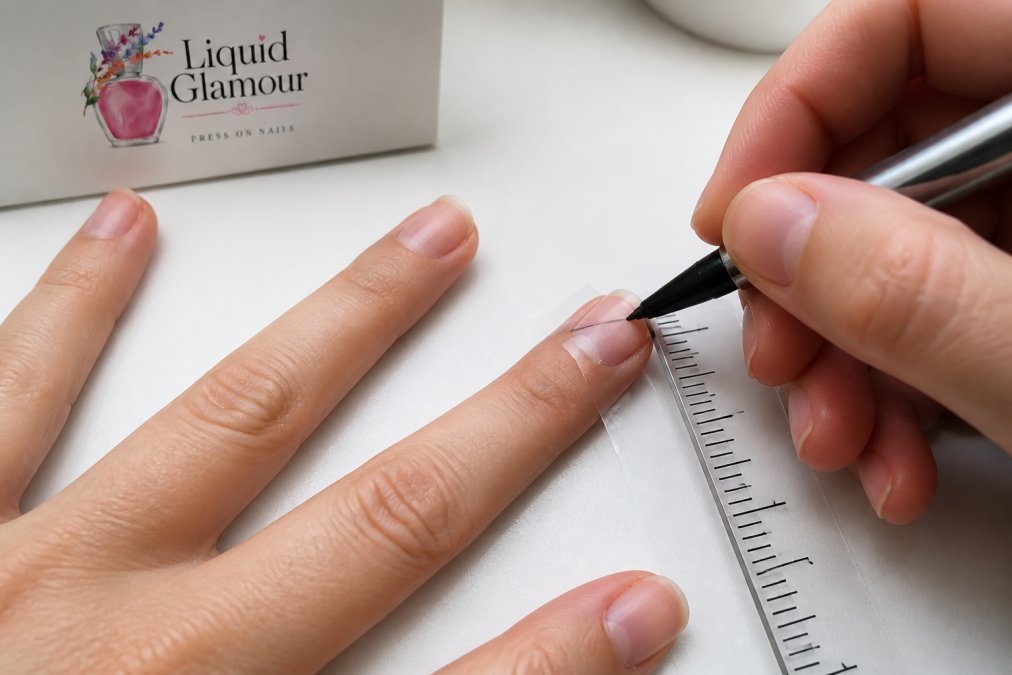
Step-by-Step Measurement in Millimeters
- Wipe off any polish or oil from your bare nails.
- Lay a strip of transparent tape across your nail.
- Mark the tape at both sidewalls with your pen.
- Peel off the tape and lay it flat on a ruler.
- Write down the width in millimeters for each finger.
- Repeat on your other hand, since sizes often differ.
Fitting Tips for Natural Nail Beds and Damaged Nails
Damaged nails from gel manicures still work with press-ons. A damaged nail plate can be thinner, so choose a size that covers the full width without overhang, and buff lightly before applying so a peeling or splitting nail has a smooth base. Also measure when your hands are dry, nails swell slightly when wet, and sizing on a wet nail is a common mistake.
Reading a Press On Nail Sizing Kit and Size Chart
A press on nail sizing kit removes the guesswork. Most kits include trial tips numbered 0 through 9 or 11 plus a printed size chart, and they are the fastest path to an accurate size because you test physical tips against your actual nail plate instead of converting numbers on paper.
Here's how to use one:
- Press each trial tip across your nail, sidewall to sidewall.
- Find the tip that covers your nail without touching skin.
- Match that number to the size chart.
- Note the number for every finger before you order.
What the Numbers on a Size Chart Actually Mean
A press-on size chart is a conversion table, not a universal scale. Each row pairs a size number with a millimeter width, a size 0 might be 18 mm and a size 9 at 10 mm. Those millimeter values are the real measurement; the number is just a brand label. That matters because size numbers are not standardized across brands: a size 3 from one brand can measure 14 mm while another measures 15.5 mm.
When Your Finger Falls Between Two Sizes
Few people land exactly on a chart number. When your measurement sits between two sizes:
- Go up if your natural nail is wide at the free edge, if the smaller tip pinches your sidewalls, or if you plan to file the sides down.
- Go down if the larger tip overhangs onto skin, if your nail tapers sharply toward the tip, or if you are applying over a shorter natural nail.
Build a Reusable Size Card
Once you have your numbers, write them down in finger order, thumb, index, middle, ring, pinky, for each hand, noting the brand and chart date. Keep that card in your phone's notes app. Next time you order that brand, you skip the kit entirely; with a new brand, you only re-check fingers near a size boundary. Keep one card per brand, since a single "my size is 4" note will fail you the moment you switch makers.
How to File Press On Nails for Better Fit
Filing fixes small gaps that sizing alone can't solve, and learning how to file press on nails for better fit takes about five minutes. Use a fine-grit file and work in one direction, sawing back and forth weakens the tip edge. File the sidewalls first if the nail feels tight, then check the free edge against your natural nail tip; a tiny gap at the cuticle is fine, but the nail should sit flush at the sides.
Sizing for Curves, Shapes, and Flat vs. Convex Nail Beds
Nail width is only half the story. Curvature decides how a press-on sits on your nail plate and is the most overlooked variable in sizing: two nails can measure the same width and still need different press-ons because one arches sharply and the other lies nearly flat. A C-curve is the arch of your nail seen from the tip.
How to Measure Your C-Curve Without Special Tools
You do not need a gauge, just flexible tape and a pen.
Dalmatian Print Children's Press-On →
- Lay a strip of tape across your nail from sidewall to sidewall, pressing it down so it follows the arch.
- Mark the tape at both sidewalls.
- Peel the tape off and lay it flat on a ruler.
- Read the distance between the marks, this is your arc length, the distance the tape traveled over the curve.
- Compare it to your straight-line width from the earlier measurement.
Matching Press-Ons to Your Curve
Once you know your curve, fit decisions get simpler:
- Flat nail bed (arc ≈ width): choose press-ons marketed as flat or low-arch. A strongly curved tip will only touch at the center and lift at both sidewalls.
- Moderate C-curve (arc 1-2 mm over width): most standard press-ons fit. This is the range most mass-market sets are built for.
- Strong C-curve (arc 2 mm+ over width): choose high-arch or "curved" tips. A flat tip will bridge the arch and leave gaps along both sides.
If no tip matches, soften a strong curve by warming the press-on with a hair dryer on low for a few seconds and flexing it to a flatter arch before the adhesive sets. Work slowly, overheating warps the tip and weakens the edge.
How Nail Shape Changes the Size You Need
Shape affects fit as much as curve, because different shapes put their width in different places.
- Square and squoval: width stays consistent from cuticle to tip, so your widest-point measurement is reliable across the whole nail. These are the easiest shapes to size.
- Almond and oval: the nail narrows toward the tip, so the widest point sits lower, near the base. Measure at that lower point, not at the tip, or you will size too small.
- Stiletto and coffin: the tip tapers sharply. A press-on sized to your base width will feel loose at the tip unless the set is built with a matching taper. Look for sets described as tapered or pointed.
- Squoval with a wide free edge: treat it like a square, measure at the free edge, since that is where the press-on will contact skin first.
Flat vs. Convex Nail Beds
Nail beds also differ front to back. A convex nail bed curves outward from cuticle to tip like a shallow dome; a flat nail bed runs straight with little front-to-back curve. A press-on built for a convex bed will rock on a flat bed, lifting at the cuticle or free edge, while one built for a flat bed will bridge a convex bed and gap in the middle.
How to Make Press On Nails Stay On Longer
Prep decides how long your set lasts. Learning how to make press on nails stay on longer starts before the adhesive touches your nail.
Follow this routine:
- Push back cuticles and buff the nail plate gently.
- Wipe each nail with an alcohol pad to remove oil.
- Choose the correct size for every finger, not just most of them.
- Apply adhesive or glue, then press from cuticle to tip.
- Hold for 30 seconds with steady pressure.
- Avoid water for the first hour.
Common Sizing Mistakes to Avoid
| Mistake | Why It Hurts | The Fix |
|---|---|---|
| Measuring one hand only | Sizes differ between hands | Measure both hands |
| Measuring wet nails | Nails swell in water | Measure dry nails |
| Sizing by length, not width | Width controls fit | Measure the widest part |
| Ignoring C-curve | Gaps and lifting | Match the arch to your nail |
| Reusing a stretched nail | Loose fit | Reshape or replace it |
| Skipping the thumb | Thumbs are widest | Measure thumbs separately |
The most common mistake is ordering one size for all ten nails. Real hands rarely work that way.
Conclusion
Getting the fit right takes two minutes of measuring and saves a week of re-gluing loose nails. Liquid Glamour Nails offers reusable press-on sets in a range of sizes, including options for adults, teens, and children, so every finger gets a snug fit. Each set is designed for a salon-quality look without the salon price. Browse the collection and find your size today.
Frequently Asked Questions
Is it better for press-on nails to be bigger or smaller?
A nail that is slightly smaller than your natural nail width is better than one that is too big. An oversized press-on presses against the sidewalls and lifts at the edges, which lets water and air under the adhesive. A nail that is a bit narrow can be filed at the sides for a clean fit. Measure the widest part of your nail bed in millimeters, then round down to the nearest available size if you are between two.
What should I do if my nail size falls between two press-on sizes?
Choose the larger of the two sizes and file the sides down until the nail sits flush against your sidewalls. Filing slowly with a fine-grit file keeps the edge smooth and prevents cracking. If the larger size still feels loose after filing, move down to the smaller size and check that it covers the full width of your nail bed without exposing the corners.
Does the curvature of the nail bed affect sizing?
Yes. Two nails can share the same width in millimeters but have different C-curves, so a press-on that fits one may pop off the other. Place the press-on on your bare nail before applying adhesive. If the sides lift away from your nail plate, the curve is too flat for you. If the center lifts and the edges dig in, the curve is too deep. A sizing kit with several curve options solves this.
Do children's press-on nails come in sizes that actually fit small nails?
Yes, when the set is built for kids rather than scaled down from adult sizes. Children's sets from Liquid Glamour Nails include 24 nails per set in multiple sizes, such as the Dalmatian Print Children's Press-On Nails, priced at $16.50, and the Yellow & Black Floral Children's Press-On Nails, priced at $20.95. These Squoval sets are designed for delicate nail beds, and adult supervision is recommended during application and removal for ages 5 and up.